Docker Storage Options and why ??

Did you ever come across an error like below ever?

/usr/bin/docker-current: Error response from daemon: devmapper: Thin Pool has 1026 free data blocks which is less than minimum required 163840 free data blocks. Create more free space in thin pool or use dm.min_free_space option to change behavior.

Then you are looking at the right place.  Few things that I have to point out before telling you how to resolve this and how to go with your implementation to begin with:

  1. If you are seeing this on your local, don’t stress, re-install docker and everything should be good. (Remember: This will remove all existing images / containers / volumes).  Basically it’s a clear slate for you to do a fresh start 🙂
  2. If you are seeing this in your dev environment then I guess you can just follow 1 and no one cares
  3. But if you see this any where else like, your test / integration / staging / production environments then be sure that you took a considerably big risk and didn’t follow docker documentation to the dot.

But it is always better to understand this as a design.

Docker needs some storage to store all that you are creating with-in it’s realm.  Like when you create a container it will use some storage from this space and create a container for you… or when you pull an image… it should be able to store this somewhere, correct?  These are called storage drivers.

Now, there are different storage drivers for different version on different operating systems.  Believe it or not, every thing is very very well documented.  You can find all that information for Docker CE, here and for Docker EE, here.  And the underlying file system if required for each of these storage drivers, here.

Out of all these, overlay2 and devicemapper will suite most of the use-cases we generally find.  Above error is when you are using devicemapper.  Most commonly with loopback-device.  There are ways to get out of issues, but I was not able to recover lost space even after cleaning up the whole device.

Loopback-device will use your existing filesystem, ext3 or ext4 and devicemapper being efficient on block storage will have obvious performance hits.  To avoid this completely start using direct-lvm mode where you mount a 200G (or some according to your load) volume on your Server and use according to the load and if you ever run out of space then add another volume and extend your logical volume or lvm.

So let’s take an example, I have a CentOS server on my Oracle VirtualBox.  Now I create a new Volume on OVB and attach it to my CentOS server:

Before:

Screen Shot 2018-10-09 at 3.18.49 pm

After:

Screen Shot 2018-10-09 at 3.20.42 pm

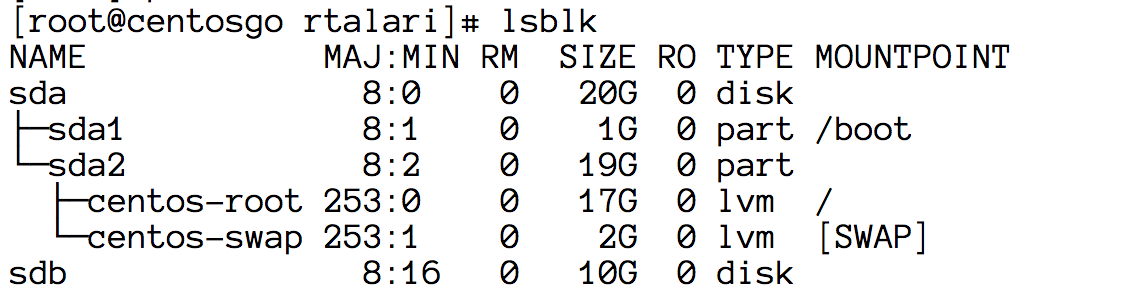
Now you see a 10G sdb in there.  Create a Physical Volume

pvcreate /dev/sdb

Create a Volume Group called docker

vgcreate docker /dev/sdb

Now create a Logical Volume (lvm) [instead of thinpool you can give any name of your choice, like thinp / tpool / thpool]

lvcreate --wipesignatures y -n thinpool docker -l 50%VG

This will create a logical volume thinpool with 50% of space from your VG which is 10G.  So it will allocate 5G for this thinpool volume.  Now you will see a link (docker-thinpool) in your /dev/mapper which will be linking to a block under /dev.

Now create some space for metadata

lvcreate --wipesignatures y -n thinpoolmeta docker -l 1%VG

This will create another directory docker-thinpoolmeta as well in your /dev/mapper.  Convert these to a thinpool using lvconvert

lvconvert -y --zero n -c 512K --thinpool docker/thinpool --poolmetadata docker/thinpoolmeta

Congratulations, you now have your thinpool with configured with direct-lvm mode.  Just one small thing that is still left to do is to make sure your thinpool can scale automatically.  Like if we fill it up by 80% (by pulling images, creating containers etc) then instead of giving us an error it will extends from 50% which 5 GB by 20% and will become 6 GB.  Put below configuration in /etc/lvm/profile/docker-thinpool.profile [VGName-ThinpoolName.profile].

activation {
  thin_pool_autoextend_threshold=80
  thin_pool_autoextend_percent=20
}

Now update your LV with this profile with lvchange command

lvchange --metadataprofile docker-thinpool docker/thinpool

Now add a monitor that will trigger auto extension of your thinkpool.

lvs -o+seg_monitor

Now create a file daemon.json in /etc/docker and below content

{
    "storage-driver": "devicemapper",
    "storage-opts": [
    "dm.thinpooldev=/dev/mapper/docker-thinpool",
    "dm.use_deferred_removal=true",
    "dm.use_deferred_deletion=true"
    ]
}

That’s it just start docker service and check docker info.  You have now devicemapper storage driver with direct-lvm mode setup.

Now when your thinpool fills up by 70% you can setup an alert and you can either cleanup by removing unwanted artifacts that are still lingering around or add another block to the VG Group and your auto-extender will keeping extending the thinpool.

Cleaning up Unwanted artifacts on docker:

$ docker ps -aq -f status=exited | xargs docker rm
$ docker ps -aq -f status=created | xargs docker rm
$ docker images -q -f dangling=true | xargs docker rmi
$ docker volume ls -q -f dangling=true | xargs docker volume rm

Extending a Thinpool Volume

It is just like extending any other logical volume:

  1. pvcreate a create a new physical volume on your new /dev/sdd
  2. Add this newly created volume to VG by vgextend docker /dev/sdd

That’s it your auto extend should be able to extend now.

Please note that you need to have permissions to execute all the commands that were given in this post.


Calico and Network Policies

Calico is CNI plugin on Kubernetes enable networking and network policy enforcement.  More details about calico can be found @ docs.projectcalico.org. Calico version used here in this demo is 2.6.2.  Please refer to calico documentation if you are trying out with a different version.

Make sure we have Kubernetes cluster with Calico CNI installed.  If not please refer to my earlier post on how to do that using Oracle VirtualBox.

Now Create two services, nginx and apache and see how we can control the traffic to these two services and also to the DNS service (kube-dns) here.

nginx.yaml used here is as below:

apiVersion: v1
kind: Namespace
metadata:
  name: www

---
apiVersion: apps/v1beta2 # for versions before 1.8.0 use apps/v1beta1
kind: Deployment
metadata:
  namespace: www
  name: nginx-deployment
spec:
  selector:
    matchLabels:
      app: nginx
  replicas: 2 # tells deployment to run 2 pods matching the template
  template: # create pods using pod definition in this template
    metadata:
      labels:
        app: nginx
    spec:
      containers:
      - name: nginx
        image: nginx
        ports:
        - containerPort: 80

---
apiVersion: v1
kind: Service
apiVersion: v1
metadata:
  namespace: www
  name: nginx
spec:
  selector:
    app: nginx
  clusterIP: 10.96.0.80
  ports:
  - protocol: TCP
    name: nginx-80
    port: 80
    targetPort: 80

apache2.yaml used here is as below:

apiVersion: apps/v1beta2 # for versions before 1.8.0 use apps/v1beta1
kind: Deployment
metadata:
  namespace: www
  name: apache2-deployment
spec:
  selector:
    matchLabels:
      app: apache2
  replicas: 2 # tells deployment to run 2 pods matching the template
  template: # create pods using pod definition in this template
    metadata:
      labels:
        app: apache2
    spec:
      containers:
      - name: apache2
        image: httpd
        ports:
        - containerPort: 80

---
apiVersion: v1
kind: Service
apiVersion: v1
metadata:
  namespace: www
  name: apache2
spec:
  selector:
    app: apache2
  clusterIP: 10.96.0.81
  ports:
  - protocol: TCP
    name: apache2
    port: 80
    targetPort: 80

Now we will have three busybox pods one in each namespace {kube-system, www, default}:

apiVersion: v1
kind: Pod
metadata:
  name: busybox
  namespace: www
spec:
  containers:
  - name: busybox
    image: busybox
    command: ["/bin/sh", "-c", "while true; do sleep 3600; done"]

---
apiVersion: v1
kind: Pod
metadata:
  name: busybox
  namespace: default
spec:
  containers:
  - name: busybox-default
    image: busybox
    command: ["/bin/sh", "-c", "while true; do sleep 3600; done"]
---
apiVersion: v1
kind: Pod
metadata:
  name: busybox
  namespace: kube-system
spec:
  containers:
  - name: busybox
    image: busybox
    command: ["/bin/sh", "-c", "while true; do sleep 3600; done"]

Apart from setting up your services and busybox pods lets also install calicoctl as a pod so that we can apply our network policies.  Below is the yaml that I used to create this pod:

apiVersion: v1
kind: Pod
metadata:
  name: calicoctl
  namespace: kube-system
spec:
  hostNetwork: true
  containers:
  - name: calicoctl
    image: quay.io/calico/ctl:v1.6.1
    command: ["/bin/sh", "-c", "while true; do sleep 3600; done"]
    env:
    - name: ETCD_ENDPOINTS
      valueFrom:
        configMapKeyRef:
          name: calico-config
          key: etcd_endpoints

Now after applying all three yaml files above out cluster would look something like this:

NAMESPACE   NAME             STATUS    AGE
            ns/default       Active    2h
            ns/kube-public   Active    2h
            ns/kube-system   Active    2h
            ns/www           Active    2h

NAMESPACE     NAME              TYPE        CLUSTER-IP      EXTERNAL-IP   PORT(S)         AGE       SELECTOR
default       svc/kubernetes    ClusterIP   10.96.0.1          <none>     443/TCP         2h        <none>
kube-system   svc/calico-etcd   ClusterIP   10.96.232.136      <none>     6666/TCP        2h        k8s-app=calico-etcd
kube-system   svc/kube-dns      ClusterIP   10.96.0.10         <none>     53/UDP,53/TCP   2h        k8s-app=kube-dns
www           svc/apache2       ClusterIP   10.96.0.81         <none>     80/TCP          2h        app=apache2
www           svc/nginx         ClusterIP   10.96.0.80         <none>     80/TCP          2h        app=nginx

NAMESPACE     NAME                                          READY     STATUS    RESTARTS   AGE       IP                NODE
default       po/busybox                                    1/1       Running   0          1h        192.168.104.22    node2
kube-system   po/busybox                                    1/1       Running   0          1h        192.168.166.157   node1
kube-system   po/calico-etcd-mcrrx                          1/1       Running   0          2h        10.0.2.4          master
kube-system   po/calico-kube-controllers-55449f8d88-w6w26   1/1       Running   0          2h        10.0.2.4          master
kube-system   po/calico-node-689qv                          2/2       Running   0          2h        10.0.2.4          master
kube-system   po/calico-node-csgdh                          2/2       Running   1          2h        172.16.0.4        node1
kube-system   po/calico-node-nc5xf                          2/2       Running   1          2h        172.16.0.5        node2
kube-system   po/calicoctl                                  1/1       Running   0          2h        172.16.0.5        node2
kube-system   po/etcd-master                                1/1       Running   0          2h        10.0.2.4          master
kube-system   po/kube-apiserver-master                      1/1       Running   0          2h        10.0.2.4          master
kube-system   po/kube-controller-manager-master             1/1       Running   0          2h        10.0.2.4          master
kube-system   po/kube-dns-545bc4bfd4-pb8vs                  3/3       Running   7          2h        192.168.166.154   node1
kube-system   po/kube-proxy-4ggld                           1/1       Running   0          2h        172.16.0.4        node1
kube-system   po/kube-proxy-4l84w                           1/1       Running   0          2h        10.0.2.4          master
kube-system   po/kube-proxy-7kqf9                           1/1       Running   0          2h        172.16.0.5        node2
kube-system   po/kube-scheduler-master                      1/1       Running   0          2h        10.0.2.4          master
www           po/apache2-deployment-b856fc995-h557f         1/1       Running   0          2h        192.168.104.21    node2
www           po/apache2-deployment-b856fc995-nct2c         1/1       Running   0          2h        192.168.166.156   node1
www           po/busybox                                    1/1       Running   0          2h        192.168.104.18    node2
www           po/nginx-deployment-75f4785b7-l29kt           1/1       Running   0          2h        192.168.104.20    node2
www           po/nginx-deployment-75f4785b7-qd48b           1/1       Running   0          2h        192.168.166.155   node1

Now we have

  1. Three busybox pods running in each namespace
  2. Two nginx and two apache2 servers running with a service each.
  3. One Calicoctl pod that we will use to apply the network policies

Below are the network policies that we are tying to implement:

First is the deny-all policy for www namespace.  It looks like this:

- apiVersion: v1
  kind: policy
  metadata:
    name: www.default-deny
  spec:
    order: 1000
    selector: calico/k8s_ns == 'www'
    types:
    - ingress
    - egress

What this policy is going to do is to block all the traffic to and from the www namespace, that means there can be no communication going out of any pods or into any pods or services that belong to this namespace.

$ kubectl exec -it -n kube-system calicoctl -- /calicoctl apply -f deny-all.yaml

Now let’s test the traffic:

$ kubectl exec -it -n kube-system calicoctl -- /calicoctl apply -f deny-all.yaml
Successfully applied 1 'policy' resource(s)
rt251j@master:~/calico$ kubectl exec -it -n www busybox -- nslookup nginx.www
Server: 10.96.0.10
Address 1: 10.96.0.10

nslookup: can't resolve 'nginx.www'
command terminated with exit code 1

Well there you go… no communication to anyone from anywhere :).   Now let’s just enable anyone from www to access the dns service for service discovery:

- apiVersion: v1
  kind: policy
  metadata:
    name: www.allow-dns-access
  spec:
    egress:
    - action: allow
      destination:
        ports:
        - 53
        selector: has(calico/k8s_ns)
      protocol: tcp
      source: {}
    - action: allow
      destination:
        ports:
        - 53
        selector: has(calico/k8s_ns)
      protocol: udp
      source: {}
    order: 990
    selector: calico/k8s_ns == 'www'
    types:
    - egress

Now run the same test once again:

$ kubectl exec -it -n kube-system calicoctl -- /calicoctl apply -f dns.yaml
Successfully applied 1 'policy' resource(s)
$ kubectl exec -it -n kube-system busybox -- nslookup nginx.www
Server: 10.96.0.10
Address 1: 10.96.0.10 kube-dns.kube-system.svc.cluster.local

Name: nginx.www
Address 1: 10.96.0.80 nginx.www.svc.cluster.local
$ kubectl exec -it busybox -- nslookup nginx.www
Server: 10.96.0.10
Address 1: 10.96.0.10 kube-dns.kube-system.svc.cluster.local

Name: nginx.www
Address 1: 10.96.0.80 nginx.www.svc.cluster.local
$ kubectl exec -it -n www busybox -- nslookup nginx.www
Server: 10.96.0.10
Address 1: 10.96.0.10 kube-dns.kube-system.svc.cluster.local

Name: nginx.www
Address 1: 10.96.0.80 nginx.www.svc.cluster.local
$ kubectl exec -it -n www busybox -- wget -qO - -T 5 http://nginx.www
wget: download timed out
command terminated with exit code 1

Now we can see that dns queries are being resolved.  But still the nginx service is not giving out any output.  You can run the same test with apache2 service as well.  Now let’s open the gates to nginx service itself.  Below is the yaml that we are going to use:

- apiVersion: v1
 kind: policy
 metadata:
 name: www.nginx-egress
 spec:
 egress:
 - action: allow
 destination:
 selector: calico/k8s_ns == 'www' && app == 'nginx'
 source: {}
 order: 500
 selector: calico/k8s_ns == 'www'
 types:
 - egress
---
- apiVersion: v1
 kind: policy
 metadata:
 name: www.nginx-ingress
 spec:
 ingress:
 - action: allow
 destination: {}
 source:
 selector: calico/k8s_ns in {'www'}
 order: 500
 selector: calico/k8s_ns == 'www' && app == 'nginx'
 types:
 - ingress

Now let’s verify

$ kubectl exec -it -n kube-system calicoctl -- /calicoctl apply -f nginx.yaml
Successfully applied 2 'policy' resource(s)
rt251j@master:~/calico$ kubectl exec -it -n www busybox -- wget -qO - -T 5 http://nginx.www
<!DOCTYPE html>
<html>
<head>
<title>Welcome to nginx!</title>
<style>
 body {
 width: 35em;
 margin: 0 auto;
 font-family: Tahoma, Verdana, Arial, sans-serif;
 }
</style>
</head>
<body>
<h1>Welcome to nginx!</h1>
<p>If you see this page, the nginx web server is successfully installed and
working. Further configuration is required.</p>

<p>For online documentation and support please refer to
<a href="http://nginx.org/">nginx.org</a>.<br/>
Commercial support is available at
<a href="http://nginx.com/">nginx.com</a>.</p>

<p><em>Thank you for using nginx.</em></p>
</body>
</html>
$ kubectl exec -it -n kube-system busybox -- wget -qO - -T 5 http://nginx.www
wget: download timed out
command terminated with exit code 1
$ kubectl exec -it busybox -- wget -qO - -T 5 http://nginx.www
wget: download timed out
command terminated with exit code 1

Now nginx service is visble to everyother component in www namespace, like busybox and apache pods in www can reach out to nginx service but no one from outside www, interesting?  Let’s make this more interesting, let’s open up nginx service to default namespace and not the kube-system namespace.

Just add ‘default’ to ingress policy source selector.  That’s it.  Apply the yaml file after the change and test it.

Now if you test apache servie then it will still be inaccessible from anywhere in our cluster.  All this while we didnot talk about the importance of order value in the network policy yaml files.  Just change the order in deny-all.yaml to 100, apply it and see how all the previous tests we have done perform.

Please find all the network policy yamls and the service yamls attached here.