Assumptions
Networking
SERVICE_CLUSTER_IP_RANGE = 10.96.0.0/16
MASTER_IP=172.168.0.3
POD_CIDR = 192.168.0.0/16
If you happend to be behind proxy, then please follow the insturctions given @ Docker Docs to setup your docker so that it can run in a proxy environment.
Setting up VMs in Oracle Virtual Box
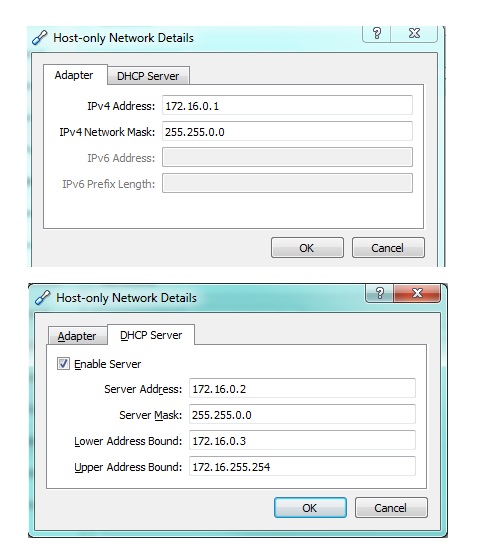
Setup a Host Only Network
Create VMs
Create Three VMs:
- Master
1.2. CPU: 2
1.3. Memory: 2GB
1.4. Networks Adapaters: 2
1.4.1 NAT / NAT Network
1.4.2 Host Only Adapter with above Host only network - Node1
2.1 CPU: 2
2.2 Memory: 4GB
2.3 Networks Adapaters: 2
2.3.1 NAT / NAT Network
2.3.2 Host Only Adapter with above Host only network - Node2
3.1 CPU: 2
3.2 Memory: 4GB
3.3 Networks Adapaters: 2
3.3.1 NAT / NAT Network
3.3.2 Host Only Adapter with above Host only network
OS: Ubuntu 16.04 Server
Disable Swap
sudo swapoff -a
Now comment out the lines related to swap space in “/etc/fstab”. Do this on all three nodes.
Install Pre-requisites
This step is to setup all thre pre-requisites for setting up kubernetes cluster using Kubeadm. In this you will install Docker, Kubelet, Kubeadm and Kubectl on your master and nodes.
Execute:
sudo apt-get install -y docker.io
sudo apt-get update
sudo apt-get install -y
sudo install -y apt-transport-https
sudo curl -s https://packages.cloud.google.com/apt/doc/apt-key.gpg | apt-key add -
sudo cat <<EOF > /etc/apt/sources.list.d/kubernetes.list
deb http://apt.kubernetes.io/ kubernetes-xenial main
EOF
sudo apt-get update
sudo apt-get install -y kubelet kubeadm kubectl
Setting Up Kubenetes Cluster with Kubeadm
On Master
Start creating your cluster on master node by executing the below command
$ sudo -E kubeadm init --pod-network-cidr=192.168.0.0/16 --apiserver-advertise-address=172.16.0.3 --service-cidr=10.96.0.0/16
[kubeadm] WARNING: kubeadm is in beta, please do not use it for production clusters.
[init] Using Kubernetes version: v1.8.1
[init] Using Authorization modes: [Node RBAC]
[preflight] Running pre-flight checks
[preflight] Starting the kubelet service
[kubeadm] WARNING: starting in 1.8, tokens expire after 24 hours by default (if you require a non-expiring token use --token-ttl 0)
[certificates] Generated ca certificate and key.
[certificates] Generated apiserver certificate and key.
[certificates] apiserver serving cert is signed for DNS names [kube-master kubernetes kubernetes.default kubernetes.default.svc kubernetes.default.svc.cluster.local] and IPs [10.96.0.1 172.16.0.3]
[certificates] Generated apiserver-kubelet-client certificate and key.
[certificates] Generated sa key and public key.
[certificates] Generated front-proxy-ca certificate and key.
[certificates] Generated front-proxy-client certificate and key.
[certificates] Valid certificates and keys now exist in "/etc/kubernetes/pki"
[kubeconfig] Wrote KubeConfig file to disk: "admin.conf"
[kubeconfig] Wrote KubeConfig file to disk: "kubelet.conf"
[kubeconfig] Wrote KubeConfig file to disk: "controller-manager.conf"
[kubeconfig] Wrote KubeConfig file to disk: "scheduler.conf"
[controlplane] Wrote Static Pod manifest for component kube-apiserver to "/etc/kubernetes/manifests/kube-apiserver.yaml"
[controlplane] Wrote Static Pod manifest for component kube-controller-manager to "/etc/kubernetes/manifests/kube-controller-manager.yaml"
[controlplane] Wrote Static Pod manifest for component kube-scheduler to "/etc/kubernetes/manifests/kube-scheduler.yaml"
[etcd] Wrote Static Pod manifest for a local etcd instance to "/etc/kubernetes/manifests/etcd.yaml"
[init] Waiting for the kubelet to boot up the control plane as Static Pods from directory "/etc/kubernetes/manifests"
[init] This often takes around a minute; or longer if the control plane images have to be pulled.
[apiclient] All control plane components are healthy after 29.509714 seconds
[uploadconfig] Storing the configuration used in ConfigMap "kubeadm-config" in the "kube-system" Namespace
[markmaster] Will mark node kube-master as master by adding a label and a taint
[markmaster] Master kube-master tainted and labelled with key/value: node-role.kubernetes.io/master=""
[bootstraptoken] Using token: 620033.73faad95c5f4a5f4
[bootstraptoken] Configured RBAC rules to allow Node Bootstrap tokens to post CSRs in order for nodes to get long term certificate credentials
[bootstraptoken] Configured RBAC rules to allow the csrapprover controller automatically approve CSRs from a Node Bootstrap Token
[bootstraptoken] Creating the "cluster-info" ConfigMap in the "kube-public" namespace
[addons] Applied essential addon: kube-dns
[addons] Applied essential addon: kube-proxy

Your Kubernetes master has initialized successfully!

To start using your cluster, you need to run (as a regular user):

  mkdir -p $HOME/.kube
  sudo cp -i /etc/kubernetes/admin.conf $HOME/.kube/config
  sudo chown $(id -u):$(id -g) $HOME/.kube/config

You should now deploy a pod network to the cluster.
Run "kubectl apply -f [podnetwork].yaml" with one of the options listed at:
  http://kubernetes.io/docs/admin/addons/

You can now join any number of machines by running the following on each node as root:

  kubeadm join --token 620033.73faad95c5f4a5f4 172.16.0.3:6443 --discovery-token-ca-cert-hash sha256:0ee1125e3783df4923021b4c7eeb4a2bb0038bb2620906e35bd2a64f00e00609


rtalari@kube-master:~$ sudo kubectl get nodes;
NAME          STATUS    ROLES     AGE       VERSION
kube-master   Ready     master    1m        v1.8.0
Node 1
Adding Node1 to your cluster
$ sudo -E kubeadm join --token 620033.73faad95c5f4a5f4 172.16.0.3:6443 --discovery-token-ca-cert-hash sha256:0ee1125e3783df4923021b4c7eeb4a2bb0038bb2620906e35bd2a64f00e00609
[kubeadm] WARNING: kubeadm is in beta, please do not use it for production clusters.
[preflight] Running pre-flight checks
[preflight] Starting the kubelet service
[discovery] Trying to connect to API Server "172.16.0.3:6443"
[discovery] Created cluster-info discovery client, requesting info from "https://172.16.0.3:6443"
[discovery] Requesting info from "https://172.16.0.3:6443" again to validate TLS against the pinned public key
[discovery] Cluster info signature and contents are valid and TLS certificate validates against pinned roots, will use API Server "172.16.0.3:6443"
[discovery] Successfully established connection with API Server "172.16.0.3:6443"
[bootstrap] Detected server version: v1.8.1
[bootstrap] The server supports the Certificates API (certificates.k8s.io/v1beta1)

Node join complete:
* Certificate signing request sent to master and response
  received.
* Kubelet informed of new secure connection details.

Run 'kubectl get nodes' on the master to see this machine join.
Node 2
Add node2 to your cluster
$ kubeadm join --token 620033.73faad95c5f4a5f4 172.16.0.3:6443 --discovery-token-ca-cert-hash sha256:0ee1125e3783df4923021b4c7eeb4a2bb0038bb2620906e35bd2a64f00e00609
[kubeadm] WARNING: kubeadm is in beta, please do not use it for production clusters.
[preflight] Running pre-flight checks
[discovery] Trying to connect to API Server "172.16.0.3:6443"
[discovery] Created cluster-info discovery client, requesting info from "https://172.16.0.3:6443"
[discovery] Requesting info from "https://172.16.0.3:6443" again to validate TLS against the pinned public key
[discovery] Cluster info signature and contents are valid and TLS certificate validates against pinned roots, will use API Server "172.16.0.3:6443"
[discovery] Successfully established connection with API Server "172.16.0.3:6443"
[bootstrap] Detected server version: v1.8.1
[bootstrap] The server supports the Certificates API (certificates.k8s.io/v1beta1)

Node join complete:
* Certificate signing request sent to master and response
  received.
* Kubelet informed of new secure connection details.

Run 'kubectl get nodes' on the master to see this machine join.
On Master
See what all PODs are running on your cluster
$ kubectl get pods --all-namespaces
NAMESPACE     NAME                                  READY     STATUS    RESTARTS   AGE
kube-system   etcd-kube-master                      1/1       Running   0          25s
kube-system   kube-apiserver-kube-master            1/1       Running   0          29s
kube-system   kube-controller-manager-kube-master   1/1       Running   0          35s
kube-system   kube-dns-545bc4bfd4-f8z6w             3/3       Running   0          1m
kube-system   kube-proxy-28926                      1/1       Running   0          1m
kube-system   kube-scheduler-kube-master            1/1       Running   0          41s
See all the nodes that are deployed in your cluster
$ kubectl get nodes
NAME          STATUS     ROLES     AGE       VERSION
kube-master   Ready      master     2m        v1.8.0
kube-node1    NotReady        10s       v1.8.1
kube-node2    NotReady        4s        v1.8.1
Apply the Calico Plugin or Any CNI plugin of your choice in here
$ kubectl apply -f https://docs.projectcalico.org/v2.6/getting-started/kubernetes/installation/hosted/kubeadm/1.6/calico.yaml
configmap "calico-config" created
daemonset "calico-etcd" created
service "calico-etcd" created
daemonset "calico-node" created
deployment "calico-kube-controllers" created
deployment "calico-policy-controller" created
clusterrolebinding "calico-cni-plugin" created
clusterrole "calico-cni-plugin" created
serviceaccount "calico-cni-plugin" created
clusterrolebinding "calico-kube-controllers" created
clusterrole "calico-kube-controllers" created
serviceaccount "calico-kube-controllers" created
To get the pods and their status running in your cluster
$ kubectl get pods --all-namespaces
NAMESPACE     NAME                                       READY     STATUS              RESTARTS   AGE
kube-system   calico-etcd-hpkzt                          1/1       Running             0          5s
kube-system   calico-kube-controllers-6ff88bf6d4-nhzxn   1/1       Running             0          4s
kube-system   calico-node-j55n7                          0/2       ContainerCreating   0          4s
kube-system   calico-node-m6nlg                          1/2       Running             0          4s
kube-system   etcd-kube-master                           1/1       Running             0          1m
kube-system   kube-apiserver-kube-master                 1/1       Running             0          1m
kube-system   kube-controller-manager-kube-master        1/1       Running             0          1m
kube-system   kube-dns-545bc4bfd4-ccdxf                  3/3       Running             0          2m
kube-system   kube-proxy-gncxl                           1/1       Running             0          1m
kube-system   kube-proxy-pjxxp                           1/1       Running             0          2m
kube-system   kube-proxy-qm726                           1/1       Running             0          1m
kube-system   kube-scheduler-kube-master		 1/1       Running             0          1m
Note that some of them are still in ContainerCreating status. Wait for some time and check if all pods or up and running. For the first time it takes a while, so be patient nothings wrong with your cluster 🙂
$ kubectl get pods --all-namespaces -o wide
NAMESPACE     NAME                                       READY     STATUS    RESTARTS   AGE       IP           NODE
kube-system   calico-etcd-hpkzt                          1/1       Running   0          14m       10.0.3.7     kube-master
kube-system   calico-kube-controllers-6ff88bf6d4-nhzxn   1/1       Running   0          14m       10.0.3.7     kube-master
kube-system   calico-node-j55n7                          2/2       Running   0          14m       10.0.3.8     kube-node1
kube-system   calico-node-m6nlg                          2/2       Running   0          14m       10.0.3.9     kube-node2
kube-system   etcd-kube-master                           1/1       Running   0          15m       10.0.3.7     kube-master
kube-system   kube-apiserver-kube-master                 1/1       Running   0          15m       10.0.3.7     kube-master
kube-system   kube-controller-manager-kube-master        1/1       Running   0          15m       10.0.3.7     kube-master
kube-system   kube-dns-545bc4bfd4-ccdxf                  3/3       Running   0          16m       172.17.0.2   kube-master
kube-system   kube-proxy-gncxl                           1/1       Running   0          15m       10.0.3.9     kube-node2
kube-system   kube-proxy-pjxxp                           1/1       Running   0          16m       10.0.3.7     kube-master
kube-system   kube-proxy-qm726                           1/1       Running   0          15m       10.0.3.8     kube-node1
kube-system   kube-scheduler-kube-master                 1/1       Running   0          15m       10.0.3.7     kube-master
Below will give you the list of Services that are running in your kuebernetes cluster:
$ kubectl get services --all-namespaces
NAMESPACE     NAME          TYPE        CLUSTER-IP      EXTERNAL-IP   PORT(S)         AGE
default       kubernetes    ClusterIP   10.96.0.1               443/TCP         17h
kube-system   calico-etcd   ClusterIP   10.96.232.136           6666/TCP        11h
kube-system   kube-dns      ClusterIP   10.96.0.10              53/UDP,53/TCP   17h
Removing Taints your master (optional)
$ kubectl taint nodes --all node-role.kubernetes.io/master-
node master untainted
Now just join your master back into the cluster with (–skip-preflight-checks)
kubeadm join --token 620033.73faad95c5f4a5f4 172.16.0.3:6443 --discovery-token-ca-cert-hash sha256:0ee1125e3783df4923021b4c7eeb4a2bb0038bb2620906e35bd2a64f00e00609

Neat and nice tutorial, Thank you
LikeLiked by 1 person
Is the discovery token ca cert hash is mandatory while joining the nodes? It is not needed in v1.7..
LikeLike
DiscoveryToken or DiscoveryFile must be set. Using token-based discovery without DiscoveryTokenCACertHashes can be unsafe (https://kubernetes.io/docs/admin/kubeadm/#kubeadm-join).
Now you can use a config file to join the nodes as well. But not without establishing trust between both the master and the node. Hope that helps.
LikeLike